VueAwesomeSwiper在VUE中的使用以及遇到的問題有哪些-創新互聯
這篇文章主要為大家展示了“VueAwesomeSwiper在VUE中的使用以及遇到的問題有哪些”,內容簡而易懂,條理清晰,希望能夠幫助大家解決疑惑,下面讓小編帶領大家一起研究并學習一下“VueAwesomeSwiper在VUE中的使用以及遇到的問題有哪些”這篇文章吧。

Vue-Awesome-Swiper
輪播圖插件,可以同時支持Vue.js(1.X ~ 2.X),兼顧PC和移動端,隨著vue的廣泛使用,其中插件swiper也算是使用的比較頻繁的插件,現在分享一下使用方法以及開發中會遇到的一些問題。
我們先下載包,然后去main.js里面配置。
npm install vue-awesome-swiper --save
我們可以用import的方法
//import
import Vue from 'vue'
import VueAwesomeSwiper from 'vue-awesome-swiper'
也可以用require
var Vue = require('vue')
var VueAwesomeSwiper = require('vue-awesome-swiper')
兩者都可以達到目的,然后再mian.js里面全局注冊
Vue.use(VueAwesomeSwiper)
在模板里使用
import { swiper, swiperSlide } from 'vue-awesome-swiper'

export default {
 components: {
  swiper,
  swiperSlide
 }
}
<template>
<swiper :options="swiperOption" ref="mySwiper">
<!-- slides -->
<swiper-slide v-for="slide in swiperSlides" v-bind: :key="slide.id"></swiper-slide>
<!-- Optional controls -->
<div class="swiper-pagination" slot="pagination"></div>
<div class="swiper-button-prev" slot="button-prev"></div>
<div class="swiper-button-next" slot="button-next"></div>
</swiper>
</template>
<script>
import { swiper, swiperSlide } from 'vue-awesome-swiper'
export default {
name: 'carrousel',
components: {
swiper,
swiperSlide
},
data () {
return {
swiperOption: { //以下配置不懂的,可以去swiper官網看api,鏈接http://www.swiper.com.cn/api/
notNextTick: true, // notNextTick是一個組件自有屬性,如果notNextTick設置為true,組件則不會通過NextTick來實例化swiper,也就意味著你可以在第一時間獲取到swiper對象,假如你需要剛加載遍使用獲取swiper對象來做什么事,那么這個屬性一定要是true
autoplay: true,
loop: true,
direction: 'horizontal',
grabCursor: true,
setWrapperSize: true,
autoHeight: true,
pagination: {
el: '.swiper-pagination'
},
centeredSlides: true,
paginationClickable: true,
navigation: {
nextEl: '.swiper-button-next',
prevEl: '.swiper-button-prev'
},
keyboard: true,
mousewheelControl: true,
observeParents: true, // 如果自行設計了插件,那么插件的一些配置相關參數,也應該出現在這個對象中,如下debugger
debugger: true
},
swiperSlides: ['../../static/img/swiper1.jpg', '../../static/img/swiper2.jpg', '../../static/img/swiper3.jpg', '../../static/img/swiper4.jpg']
}
}
}
</script>
<!-- Add "scoped" attribute to limit CSS to this component only -->
<style>
html, body, #app {
height: 100%;
width: 100%;
}
.swiper-container-autoheight, .swiper-container-autoheight .swiper-slide {
height: 100vh;
}
.swiper-pagination-bullet {
width: 15px;
height: 15px;
}
.swiper-pagination-fraction, .swiper-pagination-custom, .swiper-container-horizontal > .swiper-pagination-bullets {
bottom: 8%;
}
</style>這樣就可以正常使用了,但是以下是一些開發中遇到的一些問題。
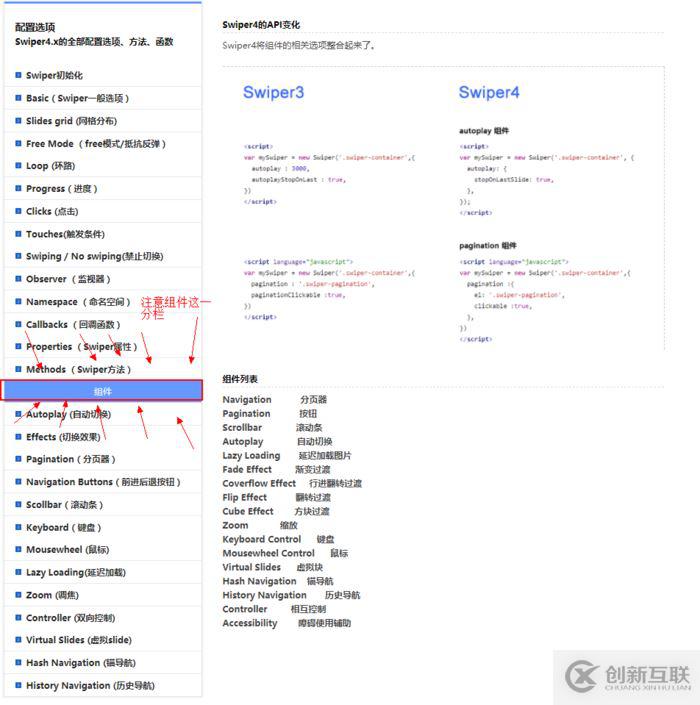
很多人在引入swiper的時候會出現小點swiper-pagination出不來或者一些配置屬性沒有生效。原因是現在最新的swiper版本已經開始區分組件和普通版本了。
在低版本swiper中,我們可以這么寫(我相信大部分童鞋百度,論壇到的使用方法大多是這樣子的)
<script>
 // swiper options example:
 export default {
  name: 'carrousel',
  data() {
   return {
    swiperOption:
     notNextTick: true,
     // swiper configs 所有的配置同swiper官方api配置
     autoplay: 3000,
     direction: 'vertical',
     grabCursor: true,
     setWrapperSize: true,
     autoHeight: true,
     pagination: '.swiper-pagination',
     paginationClickable: true,
     prevButton: '.swiper-button-prev',//上一張
     nextButton: '.swiper-button-next',//下一張
     scrollbar: '.swiper-scrollbar',//滾動條
     mousewheelControl: true,
     observeParents: true,
     debugger: true,
    }
   }
  },

 }
</script>
注意!!!!
這其中的autoplay和pagination和prevButton和nextButton等屬性,在低版本中是允許這么使用的,并且可以功能正常生效,但是再高版本swiper中這樣寫不會生效,并且vue不會報錯。
接下來我們看官網api,拿分頁器pagination舉個栗子:

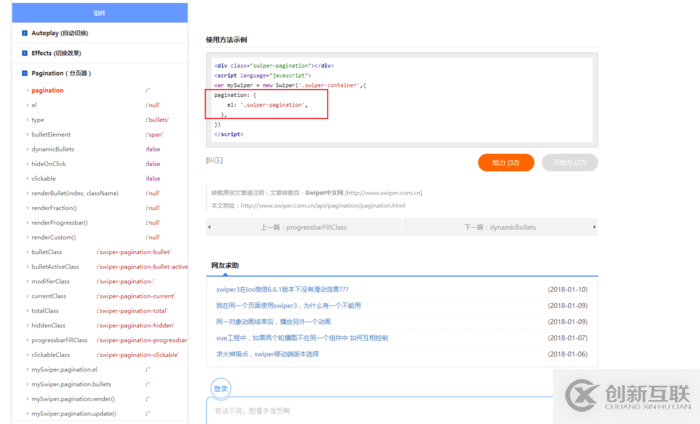
在以前低版本的swiper是沒有這樣子的區分的!所以現在我們可以看看最新版本的swiper分頁器的具體文檔:

圖中標記的部分很明顯已經不同于低版本的swiper的使用方法。
以上是“VueAwesomeSwiper在VUE中的使用以及遇到的問題有哪些”這篇文章的所有內容,感謝各位的閱讀!相信大家都有了一定的了解,希望分享的內容對大家有所幫助,如果還想學習更多知識,歡迎關注創新互聯成都網站設計公司行業資訊頻道!
另外有需要云服務器可以了解下創新互聯scvps.cn,海內外云服務器15元起步,三天無理由+7*72小時售后在線,公司持有idc許可證,提供“云服務器、裸金屬服務器、高防服務器、香港服務器、美國服務器、虛擬主機、免備案服務器”等云主機租用服務以及企業上云的綜合解決方案,具有“安全穩定、簡單易用、服務可用性高、性價比高”等特點與優勢,專為企業上云打造定制,能夠滿足用戶豐富、多元化的應用場景需求。
網站名稱:VueAwesomeSwiper在VUE中的使用以及遇到的問題有哪些-創新互聯
本文鏈接:http://vcdvsql.cn/article16/epdgg.html
成都網站建設公司_創新互聯,為您提供用戶體驗、域名注冊、標簽優化、云服務器、ChatGPT、品牌網站設計
聲明:本網站發布的內容(圖片、視頻和文字)以用戶投稿、用戶轉載內容為主,如果涉及侵權請盡快告知,我們將會在第一時間刪除。文章觀點不代表本網站立場,如需處理請聯系客服。電話:028-86922220;郵箱:631063699@qq.com。內容未經允許不得轉載,或轉載時需注明來源: 創新互聯

- 全網營銷推廣的發展趨勢是怎樣的? 2015-06-22
- 網站想要實現全網營銷需要做到哪些內容? 2015-12-21
- 企業全網營銷型網站建設的重點有哪一些? 2016-11-07
- 如何做好全網營銷推廣 2016-11-09
- 全網營銷怎么為企業帶來更多潛在客戶? 2015-06-22
- 全網營銷的優勢是什么? 2015-06-23
- 全網營銷推廣對企業非常重要 2013-06-16
- 全網營銷具體指的是什么呢? 2014-07-07
- 全網營銷的重點是什么? 2015-06-23
- 全網營銷怎么做才有效果呢? 2014-07-08
- 機械設備行業如何做好全網營銷好 2014-04-20
- 全網營銷推廣方式 2014-07-08