Xamarin學(xué)習(xí)筆記-Layout(布局)-創(chuàng)新互聯(lián)
本文翻譯自CodeProject文章:https://www.codeproject.com/Articles/1227733/Xamarin-Notes-Xamarin-Forms-Layouts
讓客戶滿意是我們工作的目標(biāo),不斷超越客戶的期望值來自于我們對(duì)這個(gè)行業(yè)的熱愛。我們立志把好的技術(shù)通過有效、簡單的方式提供給客戶,將通過不懈努力成為客戶在信息化領(lǐng)域值得信任、有價(jià)值的長期合作伙伴,公司提供的服務(wù)項(xiàng)目有:申請(qǐng)域名、雅安服務(wù)器托管、營銷軟件、網(wǎng)站建設(shè)、陸良網(wǎng)站維護(hù)、網(wǎng)站推廣。轉(zhuǎn)載請(qǐng)注明出處:葡萄城官網(wǎng),葡萄城為開發(fā)者提供專業(yè)的開發(fā)工具、解決方案和服務(wù),賦能開發(fā)者。
在本篇教程中,我們將了解Xamarin.Forms中幾個(gè)常用的Layout類型并介紹使用這幾種布局類似進(jìn)行跨平臺(tái)移動(dòng)開發(fā)時(shí)的示例。

StackLayout(棧布局)
StackLayout允許您將視圖以垂直方向堆疊或以水平方向堆疊,這是最常用的布局。查看文檔以獲取更多詳細(xì)信息。

<StackLayout>
        <Label x:Name="MainLable"
               HorizontalOptions="Center"
               FontSize="30"
               TextColor="Black"></Label>
    </StackLayout>
Orientation
設(shè)置 Horizontal 或者 Vertical。默認(rèn)值是Vertical。
<StackLayout Orientation="Horizontal"> or <StackLayout Orientation="Vertical">
LayoutOptions定位
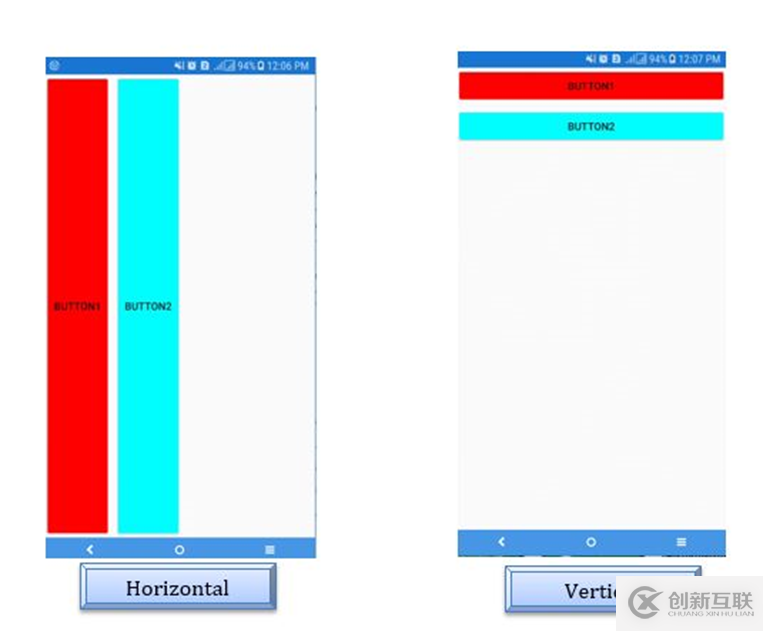
視圖可以根據(jù)相對(duì)于布局的視圖位置設(shè)置為 VerticalOptions 或者 HorizontalOptions,在這一部分我們中,我們將描述如何使用StackLayout面板將視圖組裝到水平或垂直堆疊中。
<StackLayout Orientation="Horizontal">
           <Button x:Name="Button1" Text="Button1" BackgroundColor="Red"></Button>
           <Button x:Name="Button2" Text="Button2" BackgroundColor="Aqua"></Button>
  </StackLayout>

  <StackLayout Orientation="Vertical">
           <Button x:Name="Button1" Text="Button1" BackgroundColor="Red"></Button>
           <Button x:Name="Button2" Text="Button2" BackgroundColor="Aqua"></Button>
  </StackLayout>
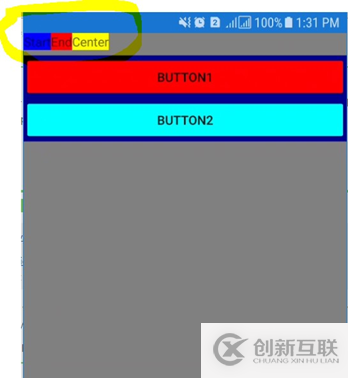
在我們的示例中,我們將兩個(gè)按鈕組合成一個(gè)水平堆疊效果(如第一張圖片所示)。
VerticalOptions 以及 HorizontalOptions 使用以下值:
Start:該選項(xiàng)將View放置在布局的起始位置。
End:該選項(xiàng)和Start剛好相反,將View放置在布局的結(jié)束位置。
Fill:該選項(xiàng)將View撐滿布局,不留白。
Center:該選項(xiàng)將視圖放置在布局的正中。
視圖是如何在父視圖中對(duì)齊的?
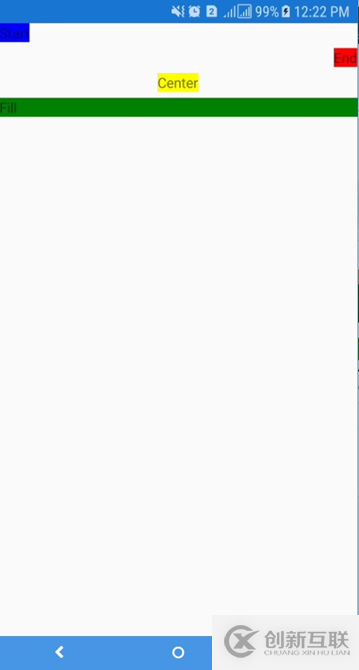
<StackLayout>
        <Label HorizontalOptions="Start" BackgroundColor="Blue" Text="Start"></Label>
         <Label HorizontalOptions="End" BackgroundColor="Red" Text="End"></Label>
         <Label HorizontalOptions="Center" BackgroundColor="Yellow" Text="Center"></Label>
         <Label HorizontalOptions="Fill" BackgroundColor="Green" Text="Fill"></Label>
</StackLayout>
用C#代碼設(shè)置如下
var stack = new StackLayout();
        var labelStart = new Label()
        {
            HorizontalOptions = LayoutOptions.Start,
            BackgroundColor = Color.Blue,
            Text = "Start"
        };
        var labelEnd = new Label()
        {
          HorizontalOptions = LayoutOptions.End,
          BackgroundColor = Color.Red,
          Text = "End"
        };
        var labelCenter = new Label()
       {
        HorizontalOptions = LayoutOptions.Center,
        BackgroundColor = Color.Yellow,
        Text = "Center"
        };
          var labelFill = new Label()
      {

    HorizontalOptions = LayoutOptions.Fill,

    BackgroundColor = Color.Green,

    Text = "Fill"

};

stack.Children.Add(labelStart);

stack.Children.Add(labelEnd);

stack.Children.Add(labelCenter);

        stack.Children.Add(labelFill);

Content = stack;
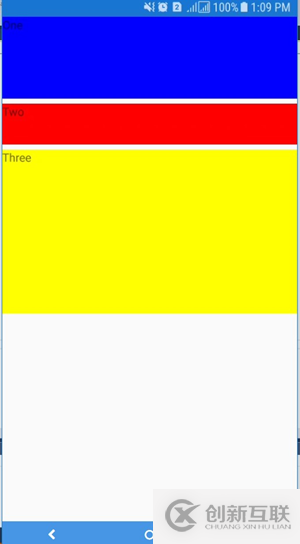
<StackLayout Orientation="Vertical">

          <Label HeightRequest="100" BackgroundColor="Blue" Text="One"/>

            <Label HeightRequest="50" BackgroundColor="Red" Text="Two"/>

           <Label HeightRequest="200" BackgroundColor="Yellow" Text="Three"/>

</StackLayout>
var stack = new StackLayout()
    {
        Orientation = StackOrientation.Vertical
    };
    var labelOne = new Label()
    {
        HeightRequest = 100,
        BackgroundColor = Color.Blue,
        Text = "One"
    };
    var labelTwo = new Label()
    {
        HeightRequest = 50,
        BackgroundColor = Color.Red,
        Text = "Two"
    };
    var labelThree = new Label()
    {
        HeightRequest = 200,
        BackgroundColor = Color.Yellow,
        Text = "Three"
    };

    stack.Children.Add(labelOne);
    stack.Children.Add(labelTwo);
    stack.Children.Add(labelThree);
    Content = stack;
Spacing
可以設(shè)置為整數(shù)或者小數(shù)。
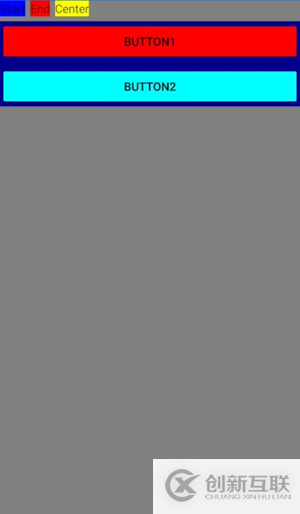
<StackLayout Orientation="Vertical" BackgroundColor="Gray">

            <StackLayout Orientation="Horizontal">

                <Label  BackgroundColor="Blue" Text="Start"></Label>

                <Label BackgroundColor="Red" Text="End"></Label>

                <Label BackgroundColor="Yellow" Text="Center"></Label>

            </StackLayout>

            <StackLayout Orientation="Vertical" BackgroundColor="DarkBlue">

                <Button x:Name="Button1" Text="Button1" BackgroundColor="Red"></Button>

                <Button x:Name="Button2" Text="Button2" BackgroundColor="Aqua"></Button>

            </StackLayout>
如果我們?cè)诘谝粋€(gè)StackLayout設(shè)置了Spacing:
<StackLayout Orientation="Horizontal" Spacing="-6"> or

<StackLayout Orientation="Horizontal" Spacing="0">
Padding 和 Margin

以下是一個(gè)示例:
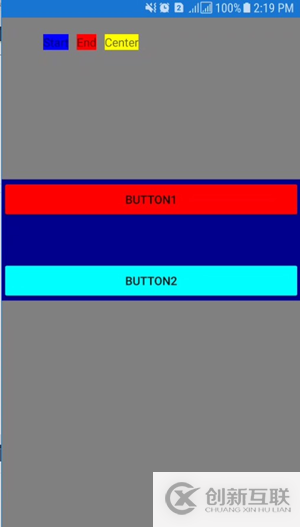
 <StackLayout Orientation="Vertical" BackgroundColor="Gray" >

            <StackLayout Orientation="Horizontal" Spacing="10" Padding="50,20,100,150">

                <Label  BackgroundColor="Blue" Text="Start"></Label>

                <Label BackgroundColor="Red" Text="End"></Label>

                <Label BackgroundColor="Yellow" Text="Center"></Label>

            </StackLayout>

            <StackLayout Orientation="Vertical" BackgroundColor="DarkBlue" Spacing="50">

                <Button x:Name="Button1" Text="Button1" BackgroundColor="Red"></Button>

                <Button x:Name="Button2" Text="Button2" BackgroundColor="Aqua"></Button>

            </StackLayout>

</StackLayout>
AbsoluteLayout(絕對(duì)布局)
AbsoluteLayou允許你在指定的絕對(duì)位置放置子元素。
有時(shí),你可能希望更多地控制屏幕上某個(gè)對(duì)象的位置,比如說,你希望將它們錨定到屏幕的邊緣,或者希望覆蓋住多個(gè)元素。
在AbsoluteLayou中,我們會(huì)使用最重要的四個(gè)值以及八個(gè)設(shè)置選項(xiàng)。
四個(gè)值是由X、Y、Width、Height組成,通過這四個(gè)值可以為你的布局進(jìn)行定位,它們中的每一個(gè)都可以被設(shè)置為比例值或絕對(duì)值。
值
可以是絕對(duì)值(以像素為單位)或者比例值(從0到1)
位置:
X:視圖錨定位置的水平位置。
Y:視圖錨定位置的垂直位置。
尺寸:
Width:定義當(dāng)前視圖的寬度。
Height:定義當(dāng)前視圖的高度。
值被指定為邊界和一個(gè)標(biāo)志的組合。LayoutBounds是由四個(gè)值組成的矩形:x,y,寬度和高度。
設(shè)置選項(xiàng)
可以是絕對(duì)值A(chǔ)bsolute標(biāo)志(以像素為單位)或者比例值Proportional標(biāo)志(從0到1)
None:全部的數(shù)值是絕對(duì)值(數(shù)值以像素為單位)。
All:表示布局邊界的全部數(shù)值均表示一個(gè)比例值(數(shù)值從0到1)。
WidthProportional:表示寬度是比例值,而其它的數(shù)值以絕對(duì)值表示。
HeightProportional:表示高度是比例值,而其它的數(shù)值以絕對(duì)值表示。
XProportional:表示X坐標(biāo)值是比例值,而將其它的數(shù)值作為絕對(duì)值對(duì)待。
YProportional:表示Y坐標(biāo)值是比例值,而將其它的數(shù)值作為絕對(duì)值對(duì)待。
PositionProportional:表示X和Y的坐標(biāo)值是比例值,而將表示尺寸的數(shù)值作為絕對(duì)值表示。
SizeProportional:表示W(wǎng)idth和Height的值是比例值,而表示位置的數(shù)值是絕對(duì)值。
更多詳細(xì)內(nèi)容請(qǐng)參見本鏈接。
結(jié)構(gòu):
<AbsoluteLayout>

      <BoxView Color="Olive"

               AbsoluteLayout.LayoutBounds="X, Y, Width, Height"

               AbsoluteLayout.LayoutFlags="FlagsValue" />

  </AbsoluteLayout>
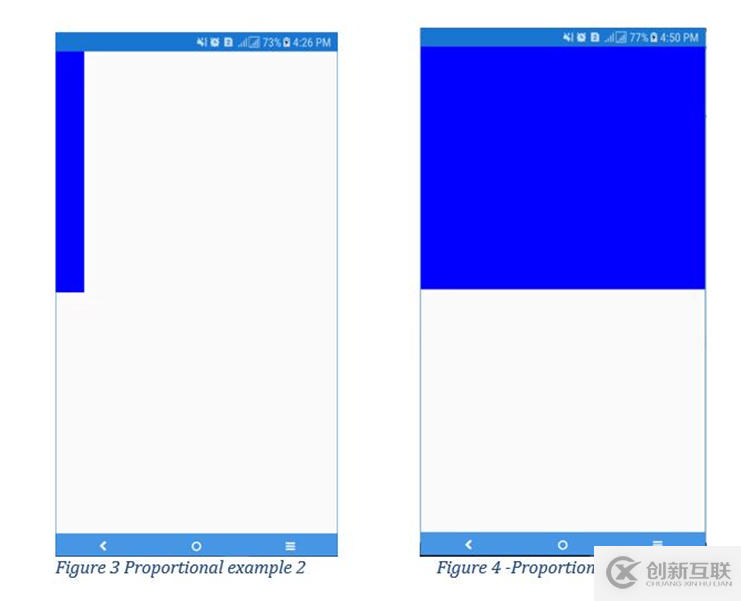
Proportional比例示例 1:
<BoxView Color="Blue"

                 AbsoluteLayout.LayoutBounds="0, 0, 0.1, 0.5"

                 AbsoluteLayout.LayoutFlags="All" />
Proportional比例示例 2:
<BoxView Color="Blue"

               AbsoluteLayout.LayoutBounds="0, 0, 1, 0.5"

               AbsoluteLayout.LayoutFlags="All" />
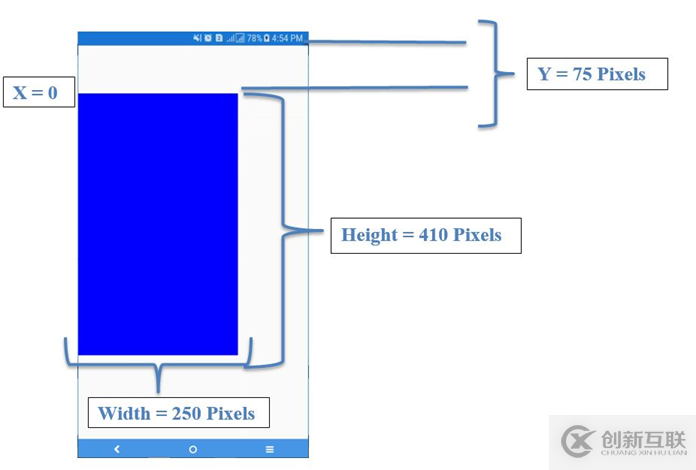
Absolute絕對(duì)值示例 1:
<BoxView Color="Blue"

                   AbsoluteLayout.LayoutBounds="0, 75, 250, 410"

                   AbsoluteLayout.LayoutFlags="None" />
RelativeLayout(相對(duì)布局)
RelativeLayout使用約束來對(duì)子視圖進(jìn)行布局。更多詳細(xì)信息請(qǐng)參見此鏈接。
與AbsoluteLayout類似,在使用RelativeLayout時(shí),我們可以將元素疊加在一起,但是它比AbsoluteLayout更加強(qiáng)大,因?yàn)槟憧梢詫⑾鄬?duì)于另一個(gè)元素的位置或大小的約束應(yīng)用于一個(gè)元素。它提供了與元素位置和大小相關(guān)的更多控制。
以下是一個(gè)示例:
約束
Type:它定義了約束是相對(duì)于父還是另一個(gè)視圖,我們可以使用以下值:RelativeToParent或Constant或RelativeToView。
Property:它定義了我們需要使用哪個(gè)屬性作為約束的基礎(chǔ)。它的值可以是Width或Height或者X再或者Y。
Factor:被用來應(yīng)用屬性的值,該值是一個(gè)小數(shù),介于0和1之間,可以寫成0.5e5的格式。
Constant:可以被用作指示一個(gè)偏移量的值。
ElementName:該約束相對(duì)于的視圖的名稱,如果我們使用關(guān)聯(lián)到某個(gè)視圖的約束關(guān)系的話。
<ScrollView>
<RelativeLayout>
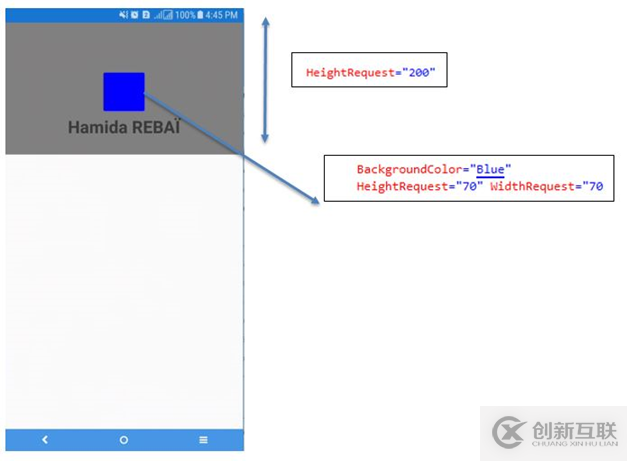
<BoxView Color="Gray" HeightRequest="200"
RelativeLayout.WidthConstraint="{ConstraintExpression
Type=RelativeToParent,
Property=Width,
Factor=1}" />
<Button BorderRadius="35"
x:Name="ImageCircleBack"
BackgroundColor="Blue"
HeightRequest="70" WidthRequest="70"
RelativeLayout.XConstraint="{ConstraintExpression Type=RelativeToParent, Property=Width, Factor=.5, Constant = -35}"
RelativeLayout.YConstraint="{ConstraintExpression Type=RelativeToParent, Factor=0, Property=Y, Constant=70}" />
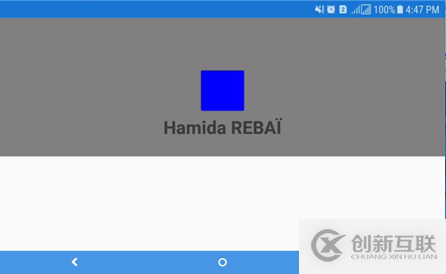
<Label Text="Hamida REBA?" FontAttributes="Bold" FontSize="26" HorizontalTextAlignment="Center"
RelativeLayout.YConstraint="{ConstraintExpression Type=RelativeToParent, Property=Y, Factor=0, Constant=140}"
RelativeLayout.WidthConstraint="{ConstraintExpression Type=RelativeToParent, Property=Width, Factor=1}" />
</RelativeLayout>
</ScrollView>
我們可以得到以下結(jié)果:
Grid(網(wǎng)格布局)
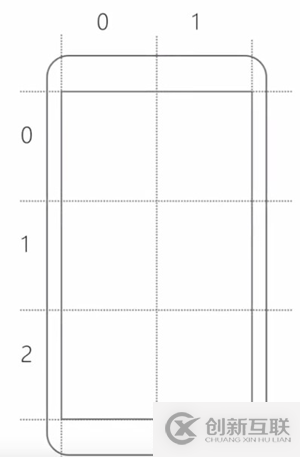
Grid和一個(gè)表格一樣。它比StackLayout更加通用,提供列和行兩個(gè)維度以供輔助定位。在不同行之間對(duì)齊視圖也很容易。實(shí)際使用起來與WPF的Grid非常類似甚至說沒什么區(qū)別。
在這一部分,我們將學(xué)習(xí)如何創(chuàng)建一個(gè)Grid并指定行和列。
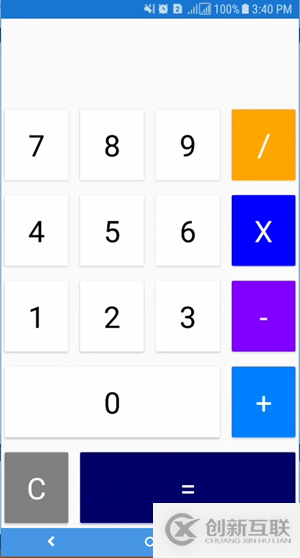
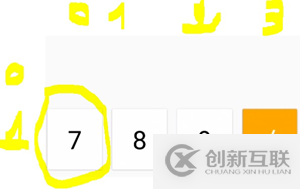
<Grid>
            <Grid.RowDefinitions>
                <RowDefinition/>
                <RowDefinition/>
                <RowDefinition/>
                <RowDefinition/>
                <RowDefinition/>
                <RowDefinition/>
            </Grid.RowDefinitions>
            <Grid.ColumnDefinitions>
                <ColumnDefinition/>
                <ColumnDefinition/>
                <ColumnDefinition/>
                <ColumnDefinition/>
            </Grid.ColumnDefinitions>

            <Button Text="7" Grid.Row="1" Grid.Column="0"

       BackgroundColor="White" TextColor="Black"

       FontSize="36" BorderRadius="0" />
            <Button Text="8" Grid.Row="1" Grid.Column="1"

       BackgroundColor="White" TextColor="Black"

       FontSize="36" BorderRadius="0" />
            <Button Text="9" Grid.Row="1" Grid.Column="2"

       BackgroundColor="White" TextColor="Black"

       FontSize="36" BorderRadius="0" />

            <Button Text="4" Grid.Row="2" Grid.Column="0"

       BackgroundColor="White" TextColor="Black"

       FontSize="36" BorderRadius="0" />
            <Button Text="5" Grid.Row="2" Grid.Column="1"

       BackgroundColor="White" TextColor="Black"

       FontSize="36" BorderRadius="0" />
            <Button Text="6" Grid.Row="2" Grid.Column="2"

       BackgroundColor="White" TextColor="Black"

       FontSize="36" BorderRadius="0" />

            <Button Text="1" Grid.Row="3" Grid.Column="0"

       BackgroundColor="White" TextColor="Black"

       FontSize="36" BorderRadius="0" />
            <Button Text="2" Grid.Row="3" Grid.Column="1"

       BackgroundColor="White" TextColor="Black"

       FontSize="36" BorderRadius="0" />
            <Button Text="3" Grid.Row="3" Grid.Column="2"

       BackgroundColor="White" TextColor="Black"

       FontSize="36" BorderRadius="0" />
            <Button Text="0" Grid.Row="4" Grid.Column="0" Grid.ColumnSpan="3"

       BackgroundColor="White" TextColor="Black"

       FontSize="36" BorderRadius="0" />

            <Button Text="/" Grid.Row="1" Grid.Column="3"

        BackgroundColor="#FFA500" TextColor="White"

        FontSize="36" BorderRadius="0" />
            <Button Text="X" Grid.Row="2" Grid.Column="3"

        BackgroundColor="#0000ff" TextColor="White"

        FontSize="36" BorderRadius="0" />
            <Button Text="-" Grid.Row="3" Grid.Column="3"

        BackgroundColor="#8000ff" TextColor="White"

        FontSize="36" BorderRadius="0" />
            <Button Text="+" Grid.Row="4" Grid.Column="3"

        BackgroundColor="#0080ff" TextColor="White"

        FontSize="36" BorderRadius="0" />

            <Button Text="C" Grid.Row="5" Grid.Column="0"

        BackgroundColor="#808080" TextColor="White"

        FontSize="36" BorderRadius="0" />

            <Button Text="=" Grid.Row="5" Grid.Column="1" Grid.ColumnSpan="3"

        BackgroundColor="#000066" TextColor="White"

        FontSize="36" BorderRadius="0" />

</Grid>
我們首先在Grid中使用這些標(biāo)記定義行數(shù)和列數(shù)。
<Grid.RowDefinitions>

     <RowDefinition/>

     <RowDefinition/>

     <RowDefinition/>

     <RowDefinition/>

     <RowDefinition/>

     <RowDefinition/>

</Grid.RowDefinitions>

<Grid.ColumnDefinitions>

     <ColumnDefinition/>

     <ColumnDefinition/>

     <ColumnDefinition/>

     <ColumnDefinition/>

</Grid.ColumnDefinitions>
在此之后,我們將在其中排布視圖
例如:
<Button Text="7" Grid.Row="1" Grid.Column="0" BackgroundColor="White" TextColor="Black" FontSize="36" BorderRadius="0" />
該按鈕將被放置在第二行(Grid.Row="1")第一列(Grid.Column="0")。
使用Height屬性定義行的高度:
<Grid.RowDefinitions>

  <RowDefinition Height="Auto" />
該值可以是Auto或者100或者星號(hào)(*),我們可以指定2*(甚至n*)。
使用Width屬性定義列的寬度:
<Grid.ColumnDefinitions>

                <ColumnDefinition Width="*"/>
該值可以是Auto或者100或者星號(hào)(*),我們可以指定2*(甚至n*)。
<Grid>
            <Grid.RowDefinitions>
                <RowDefinition Height="Auto" />
                <RowDefinition Height="*" />
                <RowDefinition Height="100" />
            </Grid.RowDefinitions>
            <Grid.ColumnDefinitions>
                <ColumnDefinition Width="*"/>
                <ColumnDefinition Width="2*"/>
            </Grid.ColumnDefinitions>
            <Label Grid.Column="0" Grid.Row="0" Text="1" BackgroundColor="Red" ></Label>
            <Label Grid.Column="1" Grid.Row="0" Text="2" BackgroundColor="Red"></Label>
            <Label Grid.Column="0" Grid.Row="1" Text="3" BackgroundColor="Red"></Label>
            <Label Grid.Column="1" Grid.Row="1" Text="4" BackgroundColor="Red"></Label>
            <Label Grid.Column="0" Grid.Row="2" Text="5" BackgroundColor="Red"></Label>
            <Label Grid.Column="1" Grid.Row="2" Text="6" BackgroundColor="Red"></Label>
        </Grid>

ScrollView
ScrollView是一個(gè)可以滾動(dòng)的內(nèi)容。
如果不使用ScrollView:
<StackLayout>
            <BoxView Color="Blue" HeightRequest="200"/>
            <BoxView Color="Green" HeightRequest="200"/>
            <BoxView Color="Firebrick" HeightRequest="200"/>
            <BoxView Color="YellowGreen" HeightRequest="300"/>
</StackLayout>
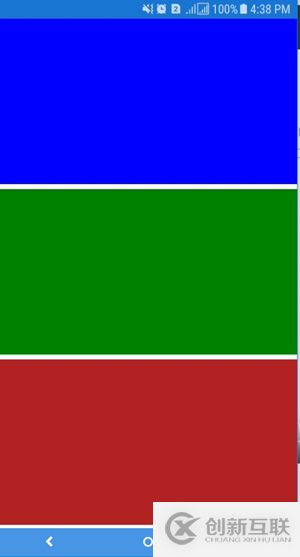
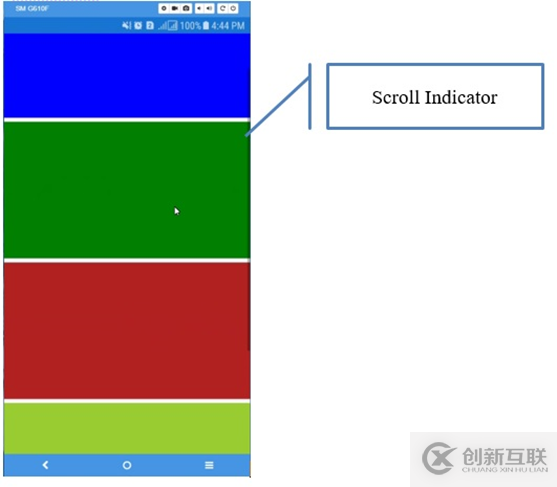
在以上示例中,顏色為Yellow Green的BoxView將不顯示,然后我們向其中添加一個(gè)ScrollView,通過滾動(dòng),我們就可以看到全部的內(nèi)容。ScrollView將向界面UI添加一個(gè)滾動(dòng)指示器。當(dāng)我們需要指定水平滾動(dòng)或者垂直滾動(dòng),再或者雙向滾動(dòng)時(shí),我們可以使用到Orientation屬性。
<ScrollView Orientation="Horizontal"> or <ScrollView Orientation="Vertical"> or <ScrollView Orientation="Both">

<ScrollView>

            <StackLayout>

                <BoxView Color="Blue" HeightRequest="200"/>

                <BoxView Color="Green" HeightRequest="200"/>

                <BoxView Color="Firebrick" HeightRequest="200"/>

                <BoxView Color="YellowGreen" HeightRequest="300"/>

</StackLayout>

</ScrollView>
更多詳細(xì)信息,請(qǐng)參見此鏈接。
ScrollView通常被用來顯示一個(gè)列表(ListView)。
下篇文章我們將說一說Page(頁面)相關(guān)的內(nèi)容。
另外有需要云服務(wù)器可以了解下創(chuàng)新互聯(lián)cdcxhl.cn,海內(nèi)外云服務(wù)器15元起步,三天無理由+7*72小時(shí)售后在線,公司持有idc許可證,提供“云服務(wù)器、裸金屬服務(wù)器、高防服務(wù)器、香港服務(wù)器、美國服務(wù)器、虛擬主機(jī)、免備案服務(wù)器”等云主機(jī)租用服務(wù)以及企業(yè)上云的綜合解決方案,具有“安全穩(wěn)定、簡單易用、服務(wù)可用性高、性價(jià)比高”等特點(diǎn)與優(yōu)勢(shì),專為企業(yè)上云打造定制,能夠滿足用戶豐富、多元化的應(yīng)用場景需求。
網(wǎng)頁標(biāo)題:Xamarin學(xué)習(xí)筆記-Layout(布局)-創(chuàng)新互聯(lián)
URL分享:http://vcdvsql.cn/article30/csecso.html
成都網(wǎng)站建設(shè)公司_創(chuàng)新互聯(lián),為您提供網(wǎng)站策劃、App開發(fā)、做網(wǎng)站、軟件開發(fā)、靜態(tài)網(wǎng)站、網(wǎng)站改版
聲明:本網(wǎng)站發(fā)布的內(nèi)容(圖片、視頻和文字)以用戶投稿、用戶轉(zhuǎn)載內(nèi)容為主,如果涉及侵權(quán)請(qǐng)盡快告知,我們將會(huì)在第一時(shí)間刪除。文章觀點(diǎn)不代表本網(wǎng)站立場,如需處理請(qǐng)聯(lián)系客服。電話:028-86922220;郵箱:631063699@qq.com。內(nèi)容未經(jīng)允許不得轉(zhuǎn)載,或轉(zhuǎn)載時(shí)需注明來源: 創(chuàng)新互聯(lián)
猜你還喜歡下面的內(nèi)容

- 寵物網(wǎng)頁設(shè)計(jì) 2022-05-30
- seo優(yōu)化中程序代碼標(biāo)簽的運(yùn)用? 2014-05-22
- 出現(xiàn)網(wǎng)址不規(guī)范的原因有如下幾點(diǎn) 2016-10-26
- 網(wǎng)絡(luò)推廣如何確定精準(zhǔn)關(guān)鍵詞的方法分析 2022-08-16
- 網(wǎng)站推廣優(yōu)化內(nèi)頁同樣重要 2016-11-05
- 成功的營銷軟文如何寫作? 2015-09-26
- 微信公開課:小程序有50多種連接方式,你知道嗎? 2022-05-20
- 與網(wǎng)站建設(shè)相關(guān)的介紹總結(jié) 2020-07-15
- 上海崇明網(wǎng)站推廣新手應(yīng)該如何進(jìn)行優(yōu)化 2020-12-08
- 選擇關(guān)鍵詞時(shí)應(yīng)遵循哪些原則? 2014-03-30
- 網(wǎng)站定時(shí)更新文章的優(yōu)點(diǎn) 2021-12-13
- 網(wǎng)站運(yùn)營文章編輯更新要點(diǎn) 2022-11-27