CentOS6.5上安裝Resin3.1-創新互聯
1、下載jdk和resin

[root@mylinux4 ~]# mkdir /opt/tools
[root@mylinux4 ~]# cd /opt/tools/
[root@mylinux4 tools]# wget http://www.caucho.com/download/resin-3.1.13.tar.gz
[root@mylinux4 tools]# ll
total 80384
-rw-r--r-- 1 root root 72036348 Oct  2 18:35 jdk-6u34-linux-x64.bin
-rw-r--r-- 1 root root 10273075 Oct  2 19:13 resin-3.1.13.tar.gz
(因為jdk需要到oracle官網下載,需要登錄oracle賬號,所以就不再說明下載過程了)
2、安裝jdk
[root@mylinux4 tools]# chmod +x jdk-6u34-linux-x64.bin
[root@mylinux4 tools]# ./jdk-6u34-linux-x64.bin
[root@mylinux4 tools]# ll
total 87592
-rw-r--r-- 1 root root  7374712 Oct  2 19:30 httpd-2.2.23.tar.gz
drwxr-xr-x 8 root root     4096 Oct  2 19:34 jdk1.6.0_34
-rwxr-xr-x 1 root root 72036348 Oct  2 18:35 jdk-6u34-linux-x64.bin
-rw-r--r-- 1 root root 10273075 Oct  2 19:13 resin-3.1.13.tar.gz
[root@mylinux4 tools]# mkdir -p /usr/local/jdk
[root@mylinux4 tools]# cp -a jdk1.6.0_34/* /usr/local/jdk/
[root@mylinux4 tools]# cd /usr/local/jdk
[root@mylinux4 jdk]# ls
bin        jre      README.html          src.zip
COPYRIGHT  lib      register.html        THIRDPARTYLICENSEREADME.txt
db         LICENSE  register_ja.html
include    man      register_zh_CN.html
[root@mylinux4 jdk]# /usr/local/jdk/bin/java -version
java version "1.6.0_34"
Java(TM) SE Runtime Environment (build 1.6.0_34-b04)
Java HotSpot(TM) 64-Bit Server VM (build 20.9-b04, mixed mode)
3、配置java環境變量
[root@mylinux4 jdk]# echo '# Add java env below' >>/etc/profile
[root@mylinux4 jdk]# echo 'export JAVA_HOME=/usr/local/jdk' >>/etc/profile
[root@mylinux4 jdk]# echo 'export CLASSPATH=$CLASSPATH:$JAVA_HOME/lib:$JAVA_HOME/jre/lib' >>/etc/profile
[root@mylinux4 jdk]# echo 'export PATH=$JAVA_HOME/bin:$JAVA_HOME/jre/bin:$PATH:$HOME/bin' >>/etc/profile
[root@mylinux4 jdk]# echo 'export RESIN_HOME=/usr/local/resin' >>/etc/profile
[root@mylinux4 jdk]# echo '# java env ended' >>/etc/profile
[root@mylinux4 jdk]# tail -6 /etc/profile
# Add java env below
export JAVA_HOME=/usr/local/jdk
export CLASSPATH=$CLASSPATH:$JAVA_HOME/lib:$JAVA_HOME/jre/lib
export PATH=$JAVA_HOME/bin:$JAVA_HOME/jre/bin:$PATH:$HOME/bin
export RESIN_HOME=/usr/local/resin
# java env ended
[root@mylinux4 jdk]# source /etc/profile
處理完成之后,進行下面的測試:
[root@mylinux4 jdk]# java -version
java version "1.6.0_34"
Java(TM) SE Runtime Environment (build 1.6.0_34-b04)
Java HotSpot(TM) 64-Bit Server VM (build 20.9-b04, mixed mode)
[root@mylinux4 jdk]# which java
/usr/local/jdk/bin/java
[root@mylinux4 jdk]# echo $JAVA_HOME
/usr/local/jdk
4、安裝resin
[root@mylinux4 jdk]# cd /opt/tools/
[root@mylinux4 tools]# tar -zxf resin-3.1.13.tar.gz
[root@mylinux4 tools]# ll
total 87596
-rw-r--r--  1 root root  7374712 Oct  2 19:30 httpd-2.2.23.tar.gz
drwxr-xr-x  8 root root     4096 Oct  2 19:34 jdk1.6.0_34
-rwxr-xr-x  1 root root 72036348 Oct  2 18:35 jdk-6u34-linux-x64.bin
drwxr-xr-x 14 root root     4096 Oct  2 20:01 resin-3.1.13
-rw-r--r--  1 root root 10273075 Oct  2 19:13 resin-3.1.13.tar.gz
[root@mylinux4 tools]# cp -a resin-3.1.13 /usr/local/resin
resin如果不和apache配合生成模塊,則不需要編譯。
5、配置resin
[root@mylinux4 tools]# cd /usr/local/resin/conf
[root@mylinux4 conf]# ll
total 48
-rw-r--r-- 1 root root 12216 Nov  9  2012 app-default.xml
-rw-r--r-- 1 root root  3007 Nov  9  2012 development.conf
-rw-r--r-- 1 root root   270 Nov  9  2012 fine.conf
-rw-r--r-- 1 root root   641 Nov  9  2012 minimal.conf
-rw-r--r-- 1 root root  9970 Nov  9  2012 resin.conf
-rw-r--r-- 1 root root  9970 Nov  9  2012 resin.conf.orig
查看一下默認配置中的server標簽:
[root@mylinux4 conf]# sed -n '88,146p' resin.conf
    <server-default>
      <!-- The http port -->
      <http address="*" port="8080"/>
      <!--
         - SSL port configuration:
         -
         - <http address="*" port="8443">
         -   <openssl>
         -     <certificate-file>keys/gryffindor.crt</certificate-file>
         -     <certificate-key-file>keys/gryffindor.key</certificate-key-file>
         -     <password>test123</password>
         -   </openssl>
         - </http>
        -->
      <!--
         - The JVM arguments
        -->
      <jvm-arg>-Xmx256m</jvm-arg>
      <jvm-arg>-Xss1m</jvm-arg>
      <jvm-arg>-Xdebug</jvm-arg>
      <jvm-arg>-Dcom.sun.management.jmxremote</jvm-arg>
      <!--
         - Uncomment to enable admin heap dumps
         - <jvm-arg>-agentlib:resin</jvm-arg>
        -->
      <!--
         - arguments for the watchdog process
        -->
      <watchdog-jvm-arg>-Dcom.sun.management.jmxremote</watchdog-jvm-arg>
      <watchdog-port>6600</watchdog-port>
      <!--
         - Configures the minimum free memory allowed before Resin
         - will force a restart.
        -->
      <memory-free-min>1M</memory-free-min>
      <!-- Maximum number of threads. -->
      <thread-max>256</thread-max>
      <!-- Configures the socket timeout -->
      <socket-timeout>65s</socket-timeout>
      <!-- Configures the keepalive -->
      <keepalive-max>128</keepalive-max>
      <keepalive-timeout>15s</keepalive-timeout>
      <!--
         - If starting bin/resin as root on Unix, specify the user name
         - and group name for the web server user.
         -
         - <user-name>resin</user-name>
         - <group-name>resin</group-name>
        -->
    </server-default>
然后重新配置該標簽:
[root@mylinux4 conf]# sed -i '88,146d' resin.conf
[root@mylinux4 conf]# vi resin.conf
[root@mylinux4 conf]# sed -n '87,98p' resin.conf
    <server id='test' address='192.168.100.182' port='6911' watchdog-port="6921">
      <http address="*" port="8080" />
 <jvm-arg>-Xmx256m</jvm-arg>  #大堆大小
 <jvm-arg>-Xss1m</jvm-arg>   #設置每個線程的stack大小
 <jvm-arg>-Xdebug</jvm-arg>
 <jvm-arg>-Dcom.sun.management.jmxremote</jvm-arg>
 <memory-free-min>1M</memory-free-min>  #當jvm的內存小于這個指定值,resin服務會graceful重啟,來釋放泄露的內存空間
 <thread-max>256</thread-max>  #大線程數量
 <socket-timeout>65s</socket-timeout>  #讀寫socket大超時時間
 <keepalive-max>128</keepalive-max>  #大長連接數量
 <keepalive-timeout>15s</keepalive-timeout>  #長連接超時時間
    </server>
6、啟動resin
[root@mylinux4 conf]# /usr/local/resin/bin/httpd.sh -server test start
Resin/3.1.13 started -server 'test' for watchdog at 127.0.0.1:6921
[root@mylinux4 conf]#
[root@mylinux4 conf]# netstat -lntup |egrep "6911|6921|8080"
tcp        0      0 :::8080                     :::*                        LISTEN      1528/java
tcp        0      0 ::ffff:192.168.100.182:6911 :::*                        LISTEN      1528/java
tcp        0      0 ::ffff:127.0.0.1:6921       :::*                        LISTEN      1499/java
7、瀏覽器訪問web頁面
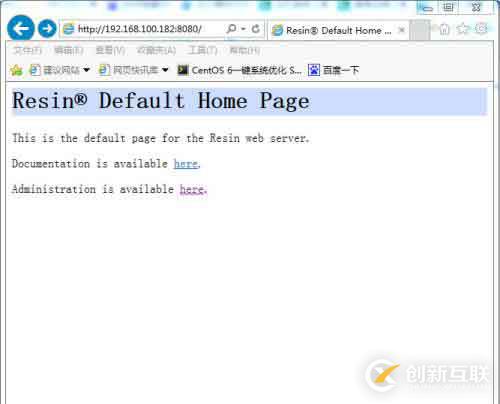
這是默認的web頁面,web文件默認路徑為安裝目錄下的webapps/ROOT.
[root@mylinux4 contrib]# ll /usr/local/resin/webapps/ROOT/
total 8
-rw-r--r-- 1 root root 1507 Nov 9 2012 index.jsp
drwxr-xr-x 5 root root 4096 Oct 2 21:35 WEB-INF
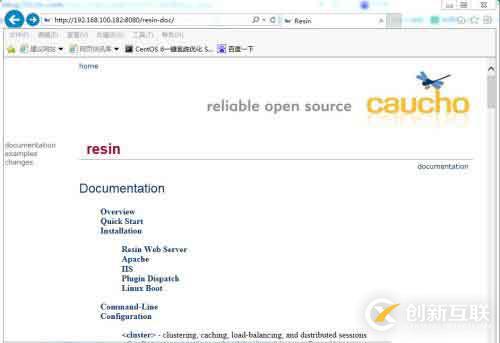
里面第一個鏈接打開是resin文檔頁面,包含resin安裝以及配置等很多文檔介紹。

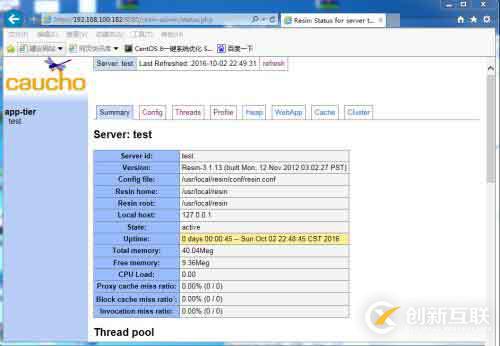
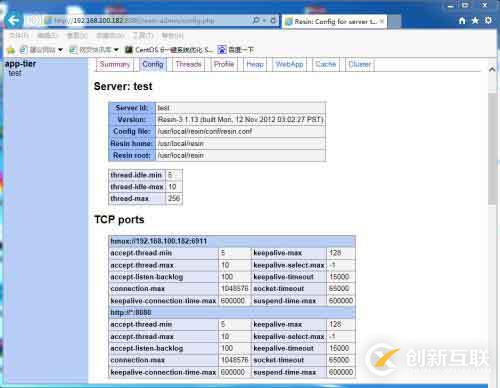
第二個鏈接是resin的管理頁面,resin提供了一個和haproxy類似的狀態監控頁面。
要想登錄這個頁面,可以在這里注冊,生成賬號信息,然后將代碼插入到resin的配置文件中,然后重啟服務即可。
1)首先注冊一個賬戶

輸入用戶名和密碼,然后提交。
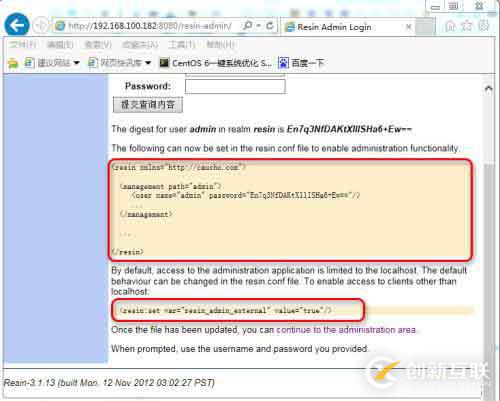
這里會生成一段代碼,將代碼插入到resin.conf中,然后修改resin.conf中一處配置即可。
2)修改resin配置
<web-app id="/resin-admin" root-directory="${resin.home}/php/admin">
<!--
- Administration application /resin-admin
-->
<prologue>
<resin:set var="resin_admin_external" value="false"/> #將這里的false改為true
<resin:set var="resin_admin_insecure" value="true"/>
</prologue>
</web-app>
<management path="${resin.root}/admin">
<user name="admin" password="password" disable="true"/> #將這里的true刪掉,改為空
<user name="admin" password="En7q3NfDAKtXllISHa6+Ew=="/> #這是上面第一步生成的代碼,只添加這一行即可,默認已經有<management>標簽了
<resin:if test="${resin.professional}">
<deploy-service/>
<jmx-service/>
<log-service/>
<xa-log-service/>
</resin:if>
</management>
3)重啟resin服務,然后輸入用戶名密碼登錄。
8、resin啟動腳本
在resin的安裝目錄下的conrtib下默認有init.resin.in和init.resin-iptables文件,一個是resin的啟動腳本模板,一個是防火墻的配置,只需要稍微修改一下就可以使用。
[root@mylinux4 contrib]# ll /usr/local/resin/contrib/
total 12
-rw-r--r-- 1 root root 2678 Nov  9  2012 build.xml
-rw-r--r-- 1 root root 1792 Nov  9  2012 init.resin.in
-rw-r--r-- 1 root root 1079 Nov  9  2012 init.resin-iptables
[root@mylinux4 contrib]# vi /usr/local/resin/contrib/init.resin.in
[root@mylinux4 contrib]# cp init.resin.in /etc/init.d/resin
[root@mylinux4 contrib]# chmod +x /etc/init.d/resin
[root@mylinux4 contrib]# /etc/init.d/resin restart
Stopping resin: .
Starting resin: .
[root@mylinux4 contrib]# netstat -lntup |egrep "6911|6921|8080"
tcp        0      0 :::8080                     :::*                        LISTEN      1665/java
tcp        0      0 ::ffff:192.168.100.182:6911 :::*                        LISTEN      1665/java
tcp        0      0 ::ffff:127.0.0.1:6921       :::*                        LISTEN      1640/java
下面是調整后的腳本內容:
[root@mylinux4 contrib]# cat /etc/init.d/resin
#!/bin/sh
#
# Linux startup script for Resin
# chkconfig: 345 85 15
# description: Resin is a Java Web server.
# processname: wrapper.pl
#
# To install, configure this file as needed and copy init.resin
# to /etc/rc.d/init.d as resin.  Then use "# /sbin/chkconfig resin reset"
#
JAVA_HOME=/usr/local/jdk
RESIN_HOME=/usr/local/resin
export JAVA_HOME RESIN_HOME
JAVA=$JAVA_HOME/bin/java
#
# If you want to start the entire Resin process as a different user,
# set this to the user name.  If you need to bind to a protected port,
# e.g. port 80, you can't use USER, but will need to use bin/resin.
#
USER=
#
# Set to the server id to start
#
SERVER="-server test"
#
ARGS="-resin-home $RESIN_HOME $SERVER"
if test -r /lib/lsb/init-functions; then
  . /lib/lsb/init-functions
else
  log_daemon_msg () {
      if [ -z "$1" ]; then
          return 1
      fi
      if [ -z "$2" ]; then
          echo -n "$1:"
          return
      fi

      echo -n "$1: $2"
  }

  log_end_msg () {
      [ -z "$1" ] && return 1
      if [ $1 -eq 0 ]; then
        echo " ."
      else
        echo " failed!"
      fi

    return $1
  }
fi
case "$1" in
  start)
log_daemon_msg "Starting resin"
if test -n "$USER"; then
    su $USER -c "$JAVA -jar $RESIN_HOME/lib/resin.jar $ARGS start" 1>/dev/null 2>/dev/null
else
    $JAVA -jar $RESIN_HOME/lib/resin.jar $ARGS start 1>/dev/null 2>/dev/null
        fi
log_end_msg $?
;;
  stop)
log_daemon_msg "Stopping resin"
if test -n "$USER"; then
    su $USER -c "$JAVA -jar $RESIN_HOME/lib/resin.jar $ARGS stop" 1>/dev/null 2>/dev/null
else
    $JAVA -jar $RESIN_HOME/lib/resin.jar $ARGS stop 1>/dev/null 2>/dev/null
        fi
log_end_msg $?
;;
  restart)
$0 stop
$0 start
;;
  *)
echo "Usage: $0 {start|stop|restart}"
exit 1
esac
exit 0
9、resin加入開機啟動項
[root@mylinux4 contrib]# chkconfig --add resin
[root@mylinux4 contrib]# chkconfig resin on
[root@mylinux4 contrib]# chkconfig --list resin
resin          0:off1:off2:on3:on4:on5:on6:off
10、resin日志設置
resin的日志默認保存在安裝目錄下的logs/access.log中,格式如下:
<access-log path="logs/access.log"
format='%h %l %u %t "%r" %s %b "%{Referer}i" "%{User-Agent}i"'
rollover-period="1W"/>
下面是resin日志的一個示例:
[root@mylinux4 contrib]# tail -f ../logs/access.log
192.168.100.1 - - [02/Oct/2016:21:36:30 +0800] "GET /resin-admin HTTP/1.1" 302 78 "http://192.168.100.182:8080/" "Mozilla/5.0 (Windows NT 6.1; WOW64; Trident/7.0; rv:11.0) like Gecko"
192.168.100.1 - - [02/Oct/2016:21:36:30 +0800] "GET /resin-admin/ HTTP/1.1" 200 2786 "http://192.168.100.182:8080/" "Mozilla/5.0 (Windows NT 6.1; WOW64; Trident/7.0; rv:11.0) like Gecko"
192.168.100.1 - - [02/Oct/2016:21:46:48 +0800] "GET /resin-doc HTTP/1.1" 302 76 "http://192.168.100.182:8080/" "Mozilla/5.0 (Windows NT 6.1; WOW64; Trident/7.0; rv:11.0) like Gecko"
192.168.100.1 - - [02/Oct/2016:21:46:48 +0800] "GET /resin-doc/ HTTP/1.1" 200 15227 "http://192.168.100.182:8080/" "Mozilla/5.0 (Windows NT 6.1; WOW64; Trident/7.0; rv:11.0) like Gecko"
192.168.100.1 - - [02/Oct/2016:21:46:52 +0800] "GET /resin-doc/doc/install.xtp HTTP/1.1" 200 6778 "http://192.168.100.182:8080/resin-doc/" "Mozilla/5.0 (Windows NT 6.1; WOW64; Trident/7.0; rv:11.0) like Gecko"
192.168.100.1 - - [02/Oct/2016:21:47:30 +0800] "GET /resin-admin HTTP/1.1" 302 78 "http://192.168.100.182:8080/" "Mozilla/5.0 (Windows NT 6.1; WOW64; Trident/7.0; rv:11.0) like Gecko"
192.168.100.1 - - [02/Oct/2016:21:47:30 +0800] "GET /resin-admin/ HTTP/1.1" 200 2786 "http://192.168.100.182:8080/" "Mozilla/5.0 (Windows NT 6.1; WOW64; Trident/7.0; rv:11.0) like Gecko"
192.168.100.1 - - [02/Oct/2016:21:48:01 +0800] "GET /resin-admin HTTP/1.1" 302 78 "http://192.168.100.182:8080/" "Mozilla/5.0 (Windows NT 6.1; WOW64; Trident/7.0; rv:11.0) like Gecko"
192.168.100.1 - - [02/Oct/2016:21:48:01 +0800] "GET /resin-admin/ HTTP/1.1" 200 2786 "http://192.168.100.182:8080/" "Mozilla/5.0 (Windows NT 6.1; WOW64; Trident/7.0; rv:11.0) like Gecko"
192.168.100.1 - - [02/Oct/2016:22:15:55 +0800] "POST /resin-admin/j_security_check?j_uri=status.php HTTP/1.1" 200 2861 "http://192.168.100.182:8080/resin-admin/" "Mozilla/5.0 (Windows NT 6.1; WOW64; Trident/7.0; rv:11.0) like Gecko"
另外有需要云服務器可以了解下創新互聯scvps.cn,海內外云服務器15元起步,三天無理由+7*72小時售后在線,公司持有idc許可證,提供“云服務器、裸金屬服務器、高防服務器、香港服務器、美國服務器、虛擬主機、免備案服務器”等云主機租用服務以及企業上云的綜合解決方案,具有“安全穩定、簡單易用、服務可用性高、性價比高”等特點與優勢,專為企業上云打造定制,能夠滿足用戶豐富、多元化的應用場景需求。
新聞標題:CentOS6.5上安裝Resin3.1-創新互聯
當前路徑:http://vcdvsql.cn/article32/dcodpc.html
成都網站建設公司_創新互聯,為您提供企業建站、電子商務、服務器托管、App開發、搜索引擎優化、云服務器
聲明:本網站發布的內容(圖片、視頻和文字)以用戶投稿、用戶轉載內容為主,如果涉及侵權請盡快告知,我們將會在第一時間刪除。文章觀點不代表本網站立場,如需處理請聯系客服。電話:028-86922220;郵箱:631063699@qq.com。內容未經允許不得轉載,或轉載時需注明來源: 創新互聯

- 云計算時代,建站選擇虛擬主機還是云服務器 2021-02-13
- 如何選擇適合自己的云服務器配置及購買注意事項 2021-02-11
- 如何更讓云服務器的使用更安全穩定? 2016-11-14
- bgp云服務器是什么 2022-10-08
- 為什么選擇云服務器? 2021-03-03
- 云服務器托管的好處有哪些? 2022-10-06
- 到底什么叫云服務器?云服務器的優勢有哪些 2022-10-06
- 如何做一位合格的云服務器銷售 2021-02-27
- 高防云服務器的云清洗功能怎樣防御DDOS攻擊 2022-10-09
- 黑客會用什么方式攻擊云服務器? 2022-10-07
- 網站維護,網站為何要做維護?云服務器租賃 2021-08-13
- 網站云服務器是怎么回事? 2016-11-12