eclipse下怎么搭建hibernate5.0環境-創新互聯
這篇文章給大家分享的是有關eclipse下怎么搭建hibernate5.0環境的內容。小編覺得挺實用的,因此分享給大家做個參考,一起跟隨小編過來看看吧。

具體如下:
hibernate引入的jar包:hibernate-release-5.0.12.Final.zip
數據庫驅動:mysql-connector-java-5.1.46
二.安裝hibernate插件
打開eclipse,點擊help-->eclipse marketplace,如圖輸入:Hibernate Tools,再點擊Goa按鈕,找到JBoss Tools
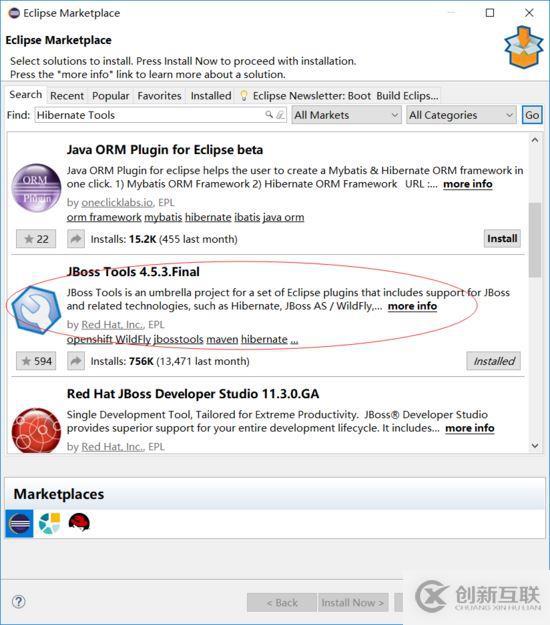
點擊install安裝
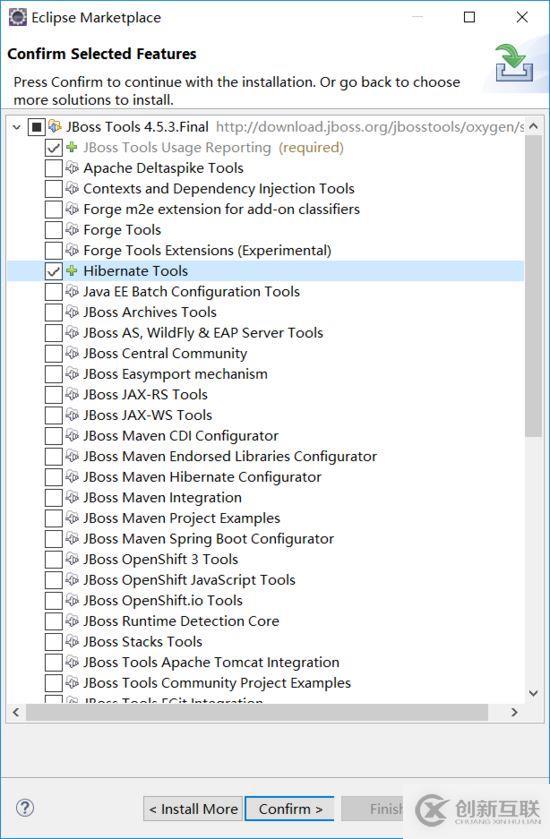
如圖選擇Hibernate Tools,點擊Confrm安裝。安裝完成后重啟eclipse。
三. 創建工程
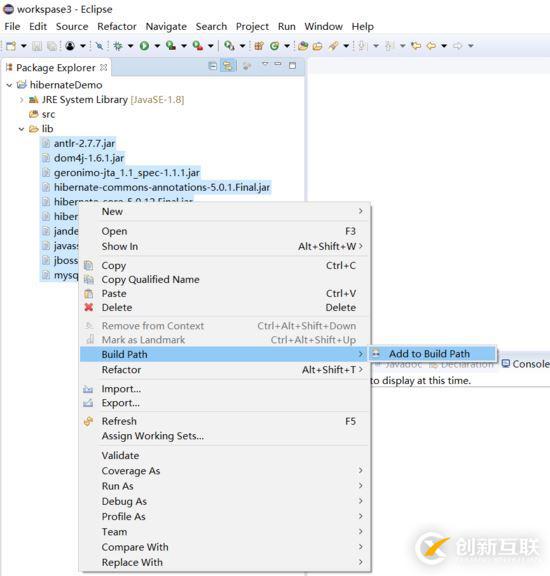
1.創建新項目hibernateDemo,在工程下建立lib文件夾。打開jar包的目錄,導入lib/required下的和數據庫的jar包,add to build path
在src下新建文件
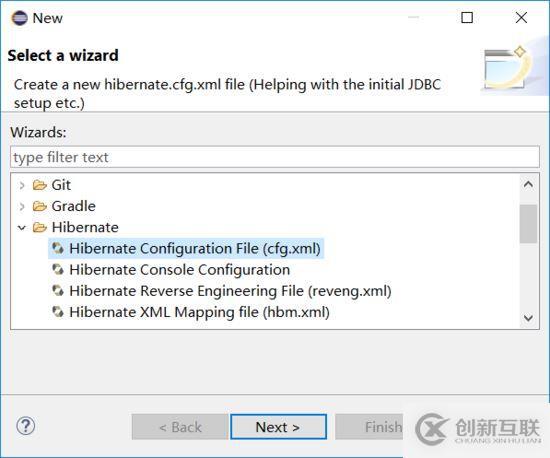
點擊next,默認文件名,點擊next,如圖配置數據庫信息
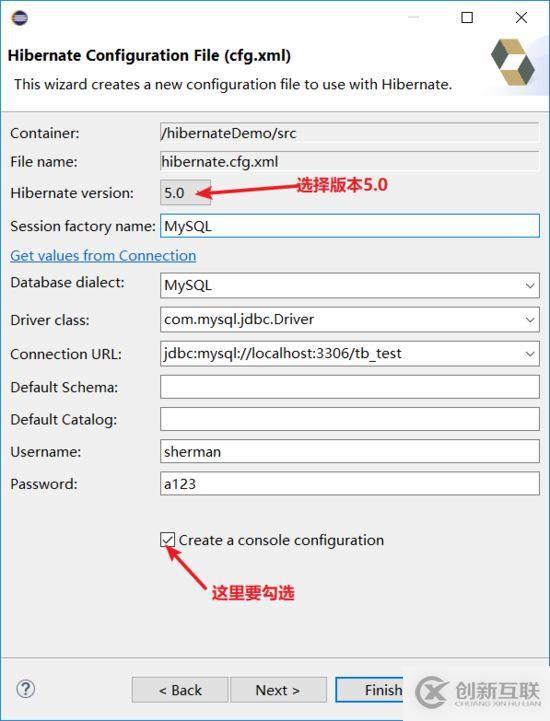
選擇UTF-8編碼方式,點擊finish,生成的hibernate.cfg.xml配置文件內容如下
<?xml version="1.0" encoding="UTF-8"?>
<!DOCTYPE hibernate-configuration PUBLIC
    "-//Hibernate/Hibernate Configuration DTD 3.0//EN"
    "http://www.hibernate.org/dtd/hibernate-configuration-3.0.dtd">
<hibernate-configuration>
  <session-factory>
    <property name="hibernate.connection.driver_class">com.mysql.jdbc.Driver</property>
    <property name="hibernate.connection.password">a123</property>
    <property name="hibernate.connection.url">jdbc:mysql://localhost:3306/tb_test</property>
    <property name="hibernate.connection.username">sherman</property>
    <property name="hibernate.dialect">org.hibernate.dialect.MySQLDialect</property>


  </session-factory>
</hibernate-configuration>
注意,把 < session-factory name ="MySQL" > 的name屬性去掉,否則報org.hibernate.engine.jndi.JndiException異常,在該文件中添加一些配置,如圖:
<?xml version="1.0" encoding="UTF-8"?>
<!DOCTYPE hibernate-configuration PUBLIC
    "-//Hibernate/Hibernate Configuration DTD 3.0//EN"
    "http://www.hibernate.org/dtd/hibernate-configuration-3.0.dtd">
<hibernate-configuration>
  <session-factory>
    <property name="hibernate.connection.driver_class">com.mysql.jdbc.Driver</property>
    <property name="hibernate.connection.password">a123</property>
    <property name="hibernate.connection.url">jdbc:mysql://localhost:3306/tb_test</property>
    <property name="hibernate.connection.username">sherman</property>

    <!-- 配置數據庫方言 -->
    <property name="hibernate.dialect">org.hibernate.dialect.MySQL5Dialect</property>
    <!-- 控制臺打印sql語句 -->
    <property name="show_sql">true</property>
    <!-- 格式化sql -->
    <property name="format_sql">true</property>
    <!--在啟動時根據配置更新數據庫 -->
    <property name="hibernate.hbm2ddl.auto">update</property>
    <!-- 配置連接池的連接數 -->
    <property name="connection.pool_size">20</property>

    <!-- 注冊實體映射類 -->
    <mapping class="com.gdut.app.entity.News"/>
  </session-factory>
</hibernate-configuration>
在src下新建一個包com.gdut.app.entity,存放持久化類News,News類代碼如下
package com.gdut.app.entity;

import javax.persistence.Entity;
import javax.persistence.GeneratedValue;
import javax.persistence.GenerationType;
import javax.persistence.Id;
import javax.persistence.Table;

@Entity
@Table(name="NEWS_INFO")
public class News {
@Id
@GeneratedValue(strategy=GenerationType.IDENTITY)
private Integer id;
private String title;
private String content;
public News() {
}
public News(Integer id, String title, String content) {
  this.id = id;
  this.title = title;
  this.content = content;
}
public Integer getId() {
  return id;
}
public void setId(Integer id) {
  this.id = id;
}
public String getTitle() {
  return title;
}
public void setTitle(String title) {
  this.title = title;
}
public String getContent() {
  return content;
}
public void setContent(String content) {
  this.content = content;
}
@Override
public String toString() {
  return "News [id=" + id + ", title=" + title + ", content=" + content + "]";
}


}
編寫測試類:
package com.gdut.app.entity;

import org.hibernate.Session;
import org.hibernate.SessionFactory;
import org.hibernate.Transaction;
import org.hibernate.cfg.Configuration;
import org.junit.Test;

public class BeanTest {

  @Test
  public void beanTest() {
//    final StandardServiceRegistry serviceRegistry = new StandardServiceRegistryBuilder()
//        .configure("hibernate.cfg.xml").build();
//
//    SessionFactory sf = new MetadataSources(serviceRegistry).buildMetadata().buildSessionFactory();
    //兩種方式都可以獲取SessionFactory
    Configuration cfg = new Configuration().configure();
    SessionFactory sf = cfg.buildSessionFactory();
    Session sess =sf.openSession();
    Transaction transaction = sess.beginTransaction();
    News n = new News();
    n.setContent("在廣工畢業");
    n.setTitle("畢業季");
    sess.save(n);
    transaction.commit();
    sess.close();

  }
}
經過測試成功
或者通過映射文件
在com.gdut.app.entity包下簡歷一個News.hbm.xml映射配置文件,修改genarator的class屬性為active
<?xml version="1.0"?>
<!DOCTYPE hibernate-mapping PUBLIC "-//Hibernate/Hibernate Mapping DTD 3.0//EN"
"http://hibernate.sourceforge.net/hibernate-mapping-3.0.dtd">
<!-- Generated 2018-5-22 23:45:23 by Hibernate Tools 3.5.0.Final -->
<hibernate-mapping>
  <class name="com.gdut.app.entity.News" table="NEWS">
    <id name="id" type="java.lang.Integer">
      <column name="ID" />
      <generator class="native"/>
    </id>
    <property name="title" type="java.lang.String">
      <column name="TITLE" />
    </property>
    <property name="content" type="java.lang.String">
      <column name="CONTENT" />
    </property>
  </class>
</hibernate-mapping>
在hibernate.cfg.xml中配置
<mapping resource="com/gdut/app/entity/News.hbm.xml"/>
測試驗證成功。
整個工程架構如圖:

感謝各位的閱讀!關于“eclipse下怎么搭建hibernate5.0環境”這篇文章就分享到這里了,希望以上內容可以對大家有一定的幫助,讓大家可以學到更多知識,如果覺得文章不錯,可以把它分享出去讓更多的人看到吧!
網頁題目:eclipse下怎么搭建hibernate5.0環境-創新互聯
當前網址:http://vcdvsql.cn/article42/dgooec.html
成都網站建設公司_創新互聯,為您提供網站改版、網站建設、動態網站、品牌網站制作、外貿建站、定制網站
聲明:本網站發布的內容(圖片、視頻和文字)以用戶投稿、用戶轉載內容為主,如果涉及侵權請盡快告知,我們將會在第一時間刪除。文章觀點不代表本網站立場,如需處理請聯系客服。電話:028-86922220;郵箱:631063699@qq.com。內容未經允許不得轉載,或轉載時需注明來源: 創新互聯

- SEO優化之網站內鏈優化的技巧! 2023-05-01
- 詳談網站內鏈構建六大方式小結 2022-08-19
- 如何優化網站內鏈 2022-09-27
- 網站制作過程中,一定要做好網站內鏈的優化 2022-08-08
- 說說網站內鏈建設的一些問題 2021-07-24
- 有關網站內鏈錨文本布局方法技巧 2020-08-05
- 4步教您怎么利用網站內鏈,實現優化效果! 2023-04-25
- 網站內鏈建設的好處與方法 2022-10-27
- 成都企業網站內鏈建設優化要怎樣做? 2023-04-04
- 創新SEO講解如何從網站內鏈加強網站排名力度 2016-07-02
- 網站內鏈優化該如何去做? 2021-12-11
- 深切體會網站內鏈建設的幾點弊端 2023-02-05